Recently, my mom bought a couple of my pens to give to friends and relatives as birthday presents. One of the recipients liked his so much that he commissioned three more! An unexpected bonus this holiday season.
Last night, I went to the monthly Seacoast Woodturners Club meeting. The topic of the evening was "Segmented Pen Turning". There is a guy there who does wonderful work with segmented bowls and such, and he had put together some pen blanks based on the pieces that he used for one of his bowls. I mentioned that I had been turning some pens this week (see paragraph above), and when no one else volunteered I was asked to turn the pen for the demo, in front of the club!
Now, I have taken part in the turning at the club before, but usually we are turning a bowl, and I am learning much more than I am teaching. Last night, though, I was able to show some of the tips that I had picked up over the last couple of years. I even decided to be daring and start using the skew chisel, which many experienced turners shy away from because of the tearout that can result. The other members seemed impressed that I was able to use the skew without any mistakes. For the first time, I really felt like I was contributing to the meetings of the group. It was a great feeling.
Of course, I have had my setbacks recently too. While making a pen last week, I put the first two parts of the kit together backwards. This made the entire kit unusable, and was something I had never done before. I just wasn't thinking. I have put together dozens of pens, and had never made that mistake. I also put together a beautiful cocobolo Classic American pen, only to find that when it was assembled, the top would not turn. I had a nice-looking non-functional pen-like sculpture. Luckily, THAT one got rescued by Don at Woodcraft and is usable now.
The pen I made at the meeting of the club is a slimline style pen that is tapered at the top, bottom, and middle, and fat otherwise. I have never made a pen with that style - all of the slimline pens I have done have been thin all the way across - and it was very interesting to make. I do not like the finished style as much, but I was given the pen when I finished turning it, and I use it in my home office as a nice reminder of the evening at the club.
Due to other issues around the house this fall, I have not progressed with the ornaments or pepper mills (I had wanted to do another one right after the class) at all, but starting in January I have signed up for another woodturning class, which meets every other week on Thursday nights from January to April. I am really looking forward to it. We will be doing spindle and bowl turning. The class is my holiday present.
Wednesday, December 17, 2008
Thursday, November 27, 2008
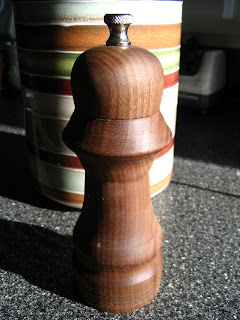
At long last, a pepper mill!
Well, it finally happened. I took my class at the Homestead Woodworking School in Newmarket, and I learned a lot that can be applied to the making of more than just pepper mills. I worked on a full lathe, too - not the mini lathe that I have at home - and that led me to think that someday I may want one. Not yet, though - there is nothing that I would be working on for a while that would require something that large.
I also learned that my knowledge of my own woodturning tools has been a bit deficient. Even after two years, I apparently had been using a bowl gouge as a spindle gouge, and had never really used the spindle gouge at all. I never even realized I HAD a bowl gouge! I felt really ignorant when I found this out, but at least I know.
During the all day course, I also learned how to make a "jam chuck", turning a piece of scrap wood so that one end of it can be held by a chuck in the headstock while the piece (in this case, the main part of the pepper mill, with the holes already drilled) could be "jammed" onto the other end. In essence, it allows a piece that would not fit onto the regular chuck to be turned on the lathe with support.
The skills learned in the class can, I think, be easily applied to turning boxes and ornaments and such. I used the spindle gouge (now that I know what it is - I still cannot believe my ignorance on that one) to do most of the shaping of the mill. I also learned a bit about how to sharpen my roughing gouge (some of which I knew, but sharpening tips are always good) and my parting tool (which I had never really sharpened on the grinder - I have been using a diamond stone). My bowl gouge will need to be re-sharpened professionally before I use it on any bowls.
I have not sold any more pens through consignment, which is no real surprise given the economy, but I did sell a couple to my mom, who gave them to friends as presents, and they were well received. Supposedly, I will be getting other commissions for pens this holiday season, but I have not gotten them yet, and time is getting short.
So...the pepper mill. I really enjoyed making it. My wife tells me that it has the look of a chess pawn, which was not at all intentional. I was trying to emulate a photograph that they had in the classroom of a particular style, but I deviated from that style and made it my own. If I had somehow been working vertically instead of horizontally on the pepper mill, I could see how I would have intentionally made it into a chess piece, but I had no idea of the resemblance until I brought it home.
I have been told that I should put a layer of beeswax on it, but I am not sure exactly how to do that. I may do it, and I may not.
I also learned that my knowledge of my own woodturning tools has been a bit deficient. Even after two years, I apparently had been using a bowl gouge as a spindle gouge, and had never really used the spindle gouge at all. I never even realized I HAD a bowl gouge! I felt really ignorant when I found this out, but at least I know.
During the all day course, I also learned how to make a "jam chuck", turning a piece of scrap wood so that one end of it can be held by a chuck in the headstock while the piece (in this case, the main part of the pepper mill, with the holes already drilled) could be "jammed" onto the other end. In essence, it allows a piece that would not fit onto the regular chuck to be turned on the lathe with support.
The skills learned in the class can, I think, be easily applied to turning boxes and ornaments and such. I used the spindle gouge (now that I know what it is - I still cannot believe my ignorance on that one) to do most of the shaping of the mill. I also learned a bit about how to sharpen my roughing gouge (some of which I knew, but sharpening tips are always good) and my parting tool (which I had never really sharpened on the grinder - I have been using a diamond stone). My bowl gouge will need to be re-sharpened professionally before I use it on any bowls.
I have not sold any more pens through consignment, which is no real surprise given the economy, but I did sell a couple to my mom, who gave them to friends as presents, and they were well received. Supposedly, I will be getting other commissions for pens this holiday season, but I have not gotten them yet, and time is getting short.
So...the pepper mill. I really enjoyed making it. My wife tells me that it has the look of a chess pawn, which was not at all intentional. I was trying to emulate a photograph that they had in the classroom of a particular style, but I deviated from that style and made it my own. If I had somehow been working vertically instead of horizontally on the pepper mill, I could see how I would have intentionally made it into a chess piece, but I had no idea of the resemblance until I brought it home.

I have been told that I should put a layer of beeswax on it, but I am not sure exactly how to do that. I may do it, and I may not.
Wednesday, October 22, 2008
Woodturner's Club meeting
Last night I went to the local Woodturner's Club meeting, and once again marveled at the various ways that people use their woodturning skills. I met someone who decided to START woodturning by making billiard cues. I love to shoot pool, but I cannot even fathom starting at that point. Of course, he has a full-size lathe, but still...
For the first time, I helped to turn a piece of "found wood" (complete with bark, at least at the start) into something that could, with luck, become a bowl or at least a hollow form. I realized how far behind I am (at least in relation to those who were there last night) when I was given the creation to finish, and I had to ask what I should do with it. At this point, I do not even have bowl tools - no bowl gouge, no scrapers...the good thing is that the holidays are coming up kind of soon. I don't even have any wax to seal the piece with until I decide to do something with it. At the advice of some of the folks at Woodcraft, I am sealing it inside of a ziplock bag. That is supposed to work until I can seal it with something like wax.
Tonight I went back to the cylinder - the one that could possibly become a pepper mill - but things did not go so well. I did find two pens to give to my mom for the commission she gave me, though.
More on the pepper mill stuff later - time for bed for now.
Monday, October 20, 2008
On the road to a pepper mill, hopefully
I have been travelling quite a bit over the last few weeks, so I have not been doing much with the woodturning. The main project has been an attempt at a pepper mill, which (as stated in my last post) was not really going all that well. Since that post, I have watched a really good video on how to turn boxes, and some of the techniques in that DVD can probably be used in the pepper mill project.
I have also enlisted the help of my friend Kurt at Woodcraft. He is a great guy who attacks projects fearlessly and is always happy to help me and answer questions. When I explained to him my issues with the pepper mill project, Kurt first showed me the different qualities of different types of Forstner bits. The ones that I had bought were fairly cheap ($5-10 each), and unfortunately it seems that with these (as with most things) you get what you pay for. Kurt showed me some carbide-tipped Forstner bits that drilled like a dream. Of course, they are each over $25, and I have to see if I will be making enough pepper mills to justify purchasing them.
Being the adventurous type, Kurt decided to see if he could make a pepper mill using the instruction sheet from Woodcraft. He soon found that there were issues with the sheet! So, he has been working on a modified set of instructions for me. I hope to pick them up soon.
In the meantime, when at the Portsmouth Farmer's Market on Saturday, I got to talk with a guy who had his own booth there. He had all sorts of woodcraft on display - carving, turning, chainsaw-carving...all of it was beautiful. While we were talking, he told me about a place nearby that does woodworking courses. They have a Pepper Mill course on November 15th. I really want to do it...I think that once I do one, I should be okay with doing more. Unlike a lot of classes, which start about halfway through the project, this one seems to be a "beginning to end" course. Should be perfect.
He also told me about a place to get some wood - I found where the place is, but I have not been able to visit it yet. It might be a way to get some local wood for less money than I have been paying for the exotics from Woodcraft. The exotics are beautiful, but the local stuff can be gorgeous too, and finding less expensive materials is a good thing.
I have been commissioned to make a couple of pens, so I may go back to that for a week or two, and concentrate on making the pepper mill and maybe a box after the middle of November, assuming I take the course.
I have received some wonderful feedback from someone who just happened to find this blog online. I am very glad that I can have a positive effect on people whom I have never met. Although I was never sure it would happen, it was (and still is) one of the intended goals of this blog.
Monday, September 22, 2008
Tales of pepper mills and such
I realize that it has been a while since I have posted (Amazingly, there is someone out there reading this who cared enough to email me and tell me to post more! :-)), but the truth is that I have not done much turning in the last couple of months. I have made a couple of pens that came out okay but not great, and learned how NOT to remove glue from the black parts of a pen kit, and I have also attempted a pepper mill for the first time.
First, the pen related issue: When assembling a pen that I made recently, I got some glue on the outside of the black cap that was part of the pen kit. The cap seemed to be made of some sort of plastic, and I was not sure how to remove the glue from it. I thought of using a glue solvent, but I was not sure what that would do to the wood, or to the glue that I MEANT to use on the cap of the pen.
So, I hit on the idea of sanding the glue off. Using a bit of 150 grit sandpaper, I rubbed lightly on the spot...thereby rubbing off the black and revealing the copper-coloured piece underneath! The black on the cap was only on the surface, and now the pen looked horrible. (black cap with a streak of copper scratched into it) I decided to sand the entire cap, to see if maybe the look could be improved by having a pen with a copper cap, but the result was not anything I could sell. I will have to use the solvent after all in order to remove the cap and put on another one if I want to try and sell it. A true bummer, as the wood came out amazingly well.
So, on to the pepper mills. I bought a Nova chuck to hold larger items (winestoppers, pepper mills, bowls when/if I get to them). At first, I was a bit perplexed, because the chuck can only hold items with a diameter of 2 inches or so, and the piece of wood that I was starting with (a standard piece available at Woodcraft) was 3" by 3". The chuck could not even hold it. I knew I was missing a piece of the puzzle, but I was not sure what it was.
it turns out that, in order to use the chuck on large pieces, you need to turn a tenon at one end of the piece that is smaller than the chuck jaws. Then the jaws grab on to the tenon, and you can work the rest of the piece. So, I needed to turn the whole piece between centers to get it rounded, and then turn a tenon at one end. I did this, and it seemed to go okay, at least to start. I got a rounded piece that fit in the tenon and was being held by the chuck.
Next up....drilling into endgrain, using Forstner bits.
Monday, July 28, 2008
Deficit spending
As I deposited the check from my latest sale yesterday, I was in a dangerous mood going into Woodcraft tonight. I knew that I did not need any wood (did not keep me from looking, though), and I thought I would buy some more opener and magnifier kits. The irony of the evening was evident in the fact that I did not want to pay more for the kits (they seem to have gone up about $2 each!), and so I ended up in a conversation with one of the many friendly salesfolk about buying a chuck for the lathe. The chuck would be my first step away from just doing spindle/mandrel work (like pens, ornaments, and such) towards things like pepper mills and (eventually) bowls. The pepper mill was my stated reason for wanting the chuck, as my wife has been wanting a pepper mill and I said a while back that I would make one for her. I think, though, once I start working with the chuck, I may find all kinds of projects for it.
The salesman (he is more of a woodturner that happens to work at the store - calling him a salesman does not do him justice, though he is quite good at selling) helped me to put together the chuck, too, which means that I would not be sitting at home thinking that I was putting it together incorrectly to start with. Why is this relevant?
Well, one of the reasons I went to Woodcraft tonight was to exchange my adjustable mandrel. It got stuck easily, and I could not get it to adjust at all. It turns out that they ship the adjustable mandrel with a small (but important!) part placed on the mandrel BACKWARDS. There is no documentation accompanying the mandrel, so unless you KNOW that it is backwards, you adjust and tighten the mandrel in such a way that it never becomes unstuck. Yet another time when I was thinking that I must have been doing some beginner idiot thing, when all along it was an easy mistake to make. Luckily, I was able to exchange it out for a new one, and Chris (the salesman) showed me how to put it together correctly.
Why they put it together backwards in the box, without any docs, just baffles me.
Chris also showed me how to keep from having pieces of wood fly off when using the parting tool (which is what happened with the dyed orange pen I tried to make recently). He suggested using the point of the skew to dig into the point where the parting would take place, as a guide for the parting tool and to keep the parting from tearing along the grain when you do not want it to. I also found out tonight that I have been sharpening my parting tool a bit incorrectly, but it can be corrected with diligence.
Started three pens and a magnifier and a letter opener last night. Tigre Caspi for one of the pens, and the magnifier and opener. Pink ivory on chrome for one pen, and a reddish cocobolo on chrome for the last one.
Saturday, July 19, 2008
Not much to show, so much to tell!
Where to begin? There is so much going on. I guess I will just reflect in the order that things occur to me:
1. I now have the domain shakeyletree.com registered! When several of my email addresses stopped working due to the interruption of swordmoon.com, I decided to take the plunge and register shakeyletree.com as a site to host my emails and pictures of my finished products from the lathe (and maybe some links too). If you would like to send me an email related to woodturning, you can send it to woodturner at shakeyletree dot com.
2. Partly because I have not been getting email for a while, and partly because I just think it is a cool store, I stopped in to Nuance today, to find out that the pen-and-letter-opener set that I made out of Tigre Caspi sold ten days ago! This is now my second sale through the store...and was such a wonderful, unexpected surprise!
3. Work on the lathe has been uneven - I was recently working on a dyed (orange) Classic American pen that I think could have come out pretty well, but a chunk of it sheared off just before the sanding step. I also noticed that the dyed woods smell a bit like acrylic, which means that I should probably wait for a cool day when I can open the garage door before I work on them again. However, I did make a beautiful magnifier using cocobolo:

Not only did the grain and colour of the wood come out really nicely (due to the wood, really, not to anything I did), but I tried something new. It is kind of hard to tell in these pictures, but I added lines near each end of the wood, as a bit of decoration. They came out even better than I had hoped.
Here is another picture, just concentrating on the stem:
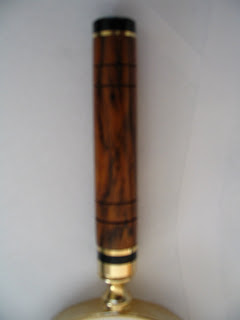
Again, kind of hard to tell, but you can see them a bit. I actually made the lines using a beading tool...I have not yet made any beads with the tool, but as I was playing around with it, I found that it made nice parallel lines in the wood, much like I have heard that wire burning would do.
After it cools off, weatherwise, I hope to work more on pens and such and maybe get a chuck to make some stoppers or a pepper mill or something.
Monday, June 9, 2008
Word of mouth
Interesting thing happened today! We were meeting with our financial adviser, and he mentioned that he has been getting a LOT of comments (good ones :-) about the pen that I gave him a while back - a Classic American made with cocobolo. As a result, he is thinking of commissioning me to make some pens. I am not sure whether they will be going to family members, or co-workers, or someone else entirely, but it is a good day when you can
a) Get compliments about something you have made, and
b) possibly get a commission to make more!
Just thought I needed to make a note of a day like this. I do not want to take these types of events for granted.
a) Get compliments about something you have made, and
b) possibly get a commission to make more!
Just thought I needed to make a note of a day like this. I do not want to take these types of events for granted.
Monday, May 19, 2008
Red Letter Day!
After a phenomenal trip through Canada (Ottawa, Toronto, Edmonton, Vancouver, Jasper, and back to Toronto and Ottawa and home), I have been trying to get back into the routine of things. Our summer of events is by no means over, but for a bit the weeks will assume something close to normalcy.
Today I received an email from Evelyn, whose store (Nuance) has my pens for sale. For the first time since she started stocking them, she sold one! I have actually sold a pen in a retail environment! It was a Double Twist Bloodwood pen, with a chrome kit. I will actually get a check for my pen at the end of this month!
I have been talking with Evelyn about perhaps putting together matching pen and letter opener kits. Inspired by today's events, I turned two letter openers and a pen tonight. I already had a bloodwood pen made, so I now have matching sets of bloodwood and Tigre Caspi wood to show to Evelyn, once we make cards for them.
I also have a piece of cocobolo that could become a magnifying glass. That will be good to show to Evelyn too, in case she wants that instead of the opener. To be truthful, the letter opener kits do not strike me as being great, but when matched with a pen they look pretty cool.
There was another cool thing tonight...I mentioned last post that there was a pen that had tubes sticking out of both halves. Well, by gluing in an extra piece of tube, and cutting the blank a certain way, I was able to save the pen. It is the Tigre Caspi pen in the set I spoke of earlier.
Tuesday, April 15, 2008
Some good, some bad...the usual.
Last night I started turning again, for the first time in a while. First, the "not so good":
I am still getting tubes stuck in the blanks when I prepare pens. Not often, but occasionally. This time it happened with a Tigre Caspi pen that I am trying to make. Getting the tube stuck in one blank of the two is okay, since some of the wood needs to be parted off anyway. However, I got it stuck in both ends...which means that I either have to use solvent to dissolve the glue and start over, or glue a piece of tube in the other end of the blank and try to salvage it. Not sure which way I will go with it.
Also, cleaning the headstock and the morse taper, while helpful, did not solve the issue. The chuck still comes off of the morse taper when I try to turn, and it is getting very annoying. I may bring the taper and the chuck to the Woodturner's Club meeting tonight. Maybe it is defective...if I do not solve it tonight, I will bring it Thursday or Saturday to Woodcraft and ask Kurt to take a look.
Now, the good:
The new Spindlemaster tool that I bought last week is fantastic. It basically acts like a skew chisel, in terms of getting close, smooth cuts, but it does not have the same risk of tearout! I am not entirely sure of the best way to sharpen it. I used my diamondstone, since it is a flat tool, but I am not sure if it should be done on the grinder instead.
I also made a good bloodwood Classic American pen, as part of pen/magnifier and pen/letter opener sets I am making. This offsets the cocobolo pen that I tried to make, where a chunk of the wood sheared off when I was using the parting tool. I had to basically lose the wood on that one, and I kept the tubes for future use.
Sunday, April 13, 2008
Wow...no posts for March?!?
You'd think that I did no woodturning for the entire month...while it was not a HEAVY month for woodturning, I did verify that the drill press was now working much better, and I set up my sharpening system and jigs the way that I wanted them (finally). The sharpening system had not really been set up correctly before. The grinder was not bolted down, so it sometimes would move while I was sharpening the tools, which is bad. Also, the spacing between the grinder and the jigs on either side was not optimal either, so I really could only use one side of the grinder at a time.
New wood: I picked up some great cocobolo (not that I needed more, but they got a new shipment at Woodcraft and it was too good to pass up). I also picked up some cheap bird's-eye maple and some burl that looked cool. Yesterday Woodcraft had a 15% off sale, and I took advantage of it. I got some new kits (magnifying glass, letter opener, key ring) and even got a new Spindlemaster tool and a couple of neat books.
A couple of weeks ago I stopped in to Nuance to talk to the owner there. I mentioned possibly doing letter openers and magnifying glasses and such, and she seemed very interested. So, I may do a couple of Classic American sets - either pen and magnifier or pen and letter opener. One set in bloodwood or maple, and one set in cocobolo.
I also got some dyed blanks yesterday. They seem to come out pretty well. I think I am set for wood for a good long while now (yeah, right).
Something I also learned yesterday, that gave me hope for doing wine stoppers and such: The reason why the chuck may be slipping out of the headstock is that the headstock may be dirty. If I clean out the headstock, and clean the taper on the chuck, then it may fit together correctly. It is worth a shot, and gives me hope, as I said. Maybe I can start doing eggs and winestoppers soon.
Tuesday, February 26, 2008
I've learned enough to teach!
Sunday evening, I taught my friend Nelson how to make a pen. We went through all of the steps together, and he did some of the turning and sanding and polishing. We ended up with a really nice Classic American click pen that he took back to Newfoundland with him.
While at Woodcraft on Sunday, though, Nelson and I noticed something about the drill press at the store. It was the same model as the one that I bought, but the one at the store seemed to have a LOT more room vertically between the chuck and the table. It turns out (though it still needs verification) that the drill press that I have might be put together incorrectly. Normally, this would be my fault, but I actually bought the floor (i.e. demonstration) model from Woodcraft when I bought my drill press, so THEY were the ones who put it together.
I am not sure what to do about this if it is true. I am going to take pictures of my drill press, and bring the pictures down to Woodcraft. HOPEfully, they will let me trade in mine for the one they have out on the floor right now, but I am not sure if they will. I mean, I know they like me and all, but they might tell me to take mine apart and put it together correctly. I will not be happy if that happens.
One of my next pens might be one of holly...maybe a slimline. I learned a tip or two when dealing with holly - clean sandpaper, and sand away from the wood towards the bushings. All of this serves to keep the dust from other wood from getting onto the holly. We'll see what happens.
Sunday, February 24, 2008
Another trip to Woodcraft
Yesterday I went with my friend Nelson to Woodcraft. I am going to teach him how to make his own pen today (hopefully), so we went to choose a kit and look at what is available in the store. I bought 5 Classic American click pen kits, and 5 Classic American twist pen kits, and a piece of Olivewood that I just could not resist. The Olivewood could be made into 8 pens, or a few winestoppers. It has a really cool black line running through it.
This is the first time that I will be trying to teach someone else how to do the pens. I guess we will make two of them - one for me to show him how to do it, and one for him to do himself (with probably a bit of help from me).
I used the rest of my Woodcraft gift card (from the holidays), so the out-of-pocket on this visit was only $20.
Tuesday, February 19, 2008
Shakey Le Tree on display
This morning, I visited Nuance, the store where Shakey Le Tree pens are now on sale. The display looks great - the pens are nicely laid out behind a glass case:

Close-up of the card at the top of the display:

Close-up of one of the pens on display:

I was really happy with the display...if they do not sell, it will not be because of a lack of effort.
I made another nice one tonight - a Cocobolo Classic American pen. I think I will be working with Cocobolo for a while...I have some great pieces that are only really good for pens (and maybe jewelry, if I can figure out how to make it), and it would be a shame not to use them. Cocobolo also always comes out unique.
I also made a mistake on a pen tonight...I was making an Olivewood Broker pen, and I got some tearout and had to start over. I lost the wood, but kept the tube, so I should be able to make another Broker pen with another piece of Olivewood.
I got back my sharpened roughing gouge on Sunday, and used it tonight for the first time. What a difference! I learned a bit about sharpening, too. The angle of the sharpening wheel changes as the tool gets sharpened multiple times, as the sharpener actually shortens the tool. So, even though I had set up the right angle for the sharpening wheel when I first set it up, I needed to change it occasionally, and I had not done that. Also, I was told that I needed to sharpen longer on the sides of the tool than I had been. I will see if I can do that successfully.
Saturday, February 16, 2008
Shakey Le Tree goes on consignment!
Today I signed my first-ever consignment agreement, and eight of the Shakey Le Tree pens will be on sale and on display at Nuance on Central Avenue in Dover, NH. It is a great feeling, and even if none of them sell, it is pretty neat that I have reached this point.
My lovely wife contributed much of the artwork on the cards accompanying the pens, and also helped to make a "Shakey Le Tree" card that will stand next to the pens in the store.
Tomorrow, I get my roughing gouge back, freshly sharpened and ready to work on more pens.
My lovely wife contributed much of the artwork on the cards accompanying the pens, and also helped to make a "Shakey Le Tree" card that will stand next to the pens in the store.
Tomorrow, I get my roughing gouge back, freshly sharpened and ready to work on more pens.
Thursday, February 14, 2008
Another milestone...
This is just a quick post, because I have to make a note of what happened today. On Monday, I received an email from someone who went into the downtown Dover store where I might soon be selling my pens. He told me that he spoke with Evelyn, and he was looking for a pen as a gift to a friend, and she gave him my contact info.
Well, this morning he showed up and bought one of the pens, a maple burl Classic American pen. It is the first pen I have ever sold to someone whom I did not know! Shakey Le Tree Designs lives and breathes, apparently.
In other news, I have severely messed up the sharpening of my roughing gouge, so I took it in to Woodcraft on the way back from Burlington on Tuesday. Don is taking it home to sharpen it, and I will get it back from him at Woodcraft on Saturday, as that is the next day that he is working there. So, no pen making until the weekend.
In the meantime, my lovely wife is helping me to create a web site for Shakey Le Tree that will just showcase the current stock and other items that I have made. It will not give the back story that I give here, about the mistakes that I make along the way. :-)
Speaking of which, I still do make mistakes - I just tend to catch them earlier. For instance, I recently attempted a pink ivory twist pen, but I did not sand it enough before polishing, and the pink ivory had lots of little pock marks (they were smooth, but visible). So, I am going to start over with that instead of making a pen from it. That way, I save the tubes and the kit, and only the wood is lost.
Income: $40
Sunday, February 10, 2008
Shakey Le Tree...at a store near you?
Big news! I went to a store downtown, a store that sells very cool crafty type items, and spoke with the owner (Evelyn) about possibly selling pens there on consignment. She seemed very much into the idea, and has been thinking of having more stock around that could be aimed towards "gifts for men". She thinks that the Classic American (and maybe Wall Street) pens would fit the bill for that. She also seemed to think that the slimline and broker pens would be good for "gifts for women", which gives me a bit of a reason for making more slimline pens.
She seemed to think that my getting $35+ per pen was not unreasonable (I told her $35-40 and up, based on the price of materials used to make the pen), as it would allow her a markup of 30% and would still keep the price point where she wants it.
One thing she mentioned was that I would need boxes, so I looked up boxes on the net and found some nice metal boxes that should work. I had to order them in a block of 24, so I hope that this whole thing really works!
I am nervous and excited about the prospect of actually selling the pens...it could allow this hobby to start paying for itself in terms of materials. This could allow me to start doing wine stoppers and pepper mills and such without being that much out of pocket. And what is the worst that could happen? They do not sell, and I have that much more stock to sell elsewhere. I am researching what kind of legal agreement I should put together to sign so that both parties know what is expected of them.
In other news...yesterday I received the kit for a pen I am making for my uncle. Along with the kit, I ordered an extra set of tubes, so that I can try to turn a couple of different types of wood and see what looks best. The kit costs $40, so I want to make sure that the turning comes out great before I assemble the pen.
Last night we went to Woodcraft, and I found a neat piece of Maple Burl that I could use for ornaments or winestoppers or...pen blanks. I am going to turn a piece of the maple burl AND a piece of cocobolo for the emperor pen, and see which comes out best.
So...a bit of financial outlay this week:
$70.95 for the Emperor Pen Kit
$17 for the Maple Burl
$11 for a kit to make a pepper mill at some point
$48 for the boxes
Total: $146.95
Friday, January 25, 2008
A trip to Wall Street to see a broker
My goodness, I seem to be making a lot of financial-related pen types! I made my first two Wall Street pens a couple of days ago, one of cocobolo and one of pink ivory. I think they came out pretty well, even though they seem small to me. I do have large hands, though, and others have said that they like them:

The strange thing about these type of pens is that they are mostly the kit. For most of the other pens I have made, the wood (or acrylic) takes up the large majority of the length of the pen. With the Wall Street pens, the kit takes up about half of the length, which makes for a much different look.
I also made a cocobolo broker pen, which came out okay, and a maple burl (undyed, this time) Classic American pen. I was also making a Bocote twist pen, but the wood split on me, so I will make a chrome twist pen with bloodwood instead.
Here is the maple burl pen:

Sunday, January 20, 2008
Another meeting of the Seacoast Woodturners
Last Tuesday night I went back to Woodcraft for the monthly meeting of the Seacoast Woodturners' Club. I went for the first time last November, but I missed the December meeting due to my trip out to LA. This time there were ten members there, and we discussed various tips and such for turning. I thought I could share some of my issues with drilling burl blanks and not being able to glue the tubes in, but it seems that no one else had ever run into that. All of their suggestions were things that I tried, which surprised me a bit. My use of the file to enlarge the holes did not seem to be something that anyone else had ever tried to do.
We made a bowl in the meeting, which was cool. Aside from one class, I have had no experience with that, so it was neat to take part. The next meeting might cover sharpening tools or making something else. I would like to do a winestopper, but I am not sure how interested the rest of the group would be.
I got my discount card, too...I think that it entitles me to a 10% discount on the nights of the meetings, but I will have to clarify that.
It is a cool group - mostly folks older (and a lot more experienced) than I, which is okay from my perspective. It means that, even though occasionally I get exposed as a newbie, I learn a lot.
First Adventures with Dyed Burl Pens
Well, I finally got the wood shop set up the way I want it, I think. We put together the new lathe stand, and arranged the shop so that the machines are standing in roughly the order in which they are used. I have my kits and blanks on a table, and on the other side of the shop I have the band saw and the drill press and the lathe, in that order. I do the gluing on the table that has the blanks on it, and I press the pens together on that table as well.
With the help of my wife, I found a nifty way to keep track of all of my pen kits. Originally, I was going to use empty soup cans to hold the kits and bushings and such, but she found a shoe bag that works perfectly. It has 24 pockets (normally for holding 12 pairs of shoes), which gives me a chance to put 24 different types of kits in there. I don't have that many, but perhaps someday I will.
Now that I can see all of the blanks that I have, and can keep track of my kits, I am starting to make some nifty pens. I decided to start using some of the cool blanks that I bought last year, now that I have some confidence that the pens will come out well. I started the new year by working with two blanks of dyed burl that I bought in Canada.
I have never worked with burl before, and until now, I had no idea that it was that different from working with other types of wood. However, I quickly found that burl has a few quirks - some of which are good. It drills VERY straight - a hole drilled from the center of one side of the blank has a good chance of coming out in the center of the other side. However, it does this because it is extremely hard wood. So, when it is being drilled, the heat builds up very quickly. I had to spray the drill bit quite a few times to cool it down.
The dyed burls apparently (note - I have now worked with two of them, which I know is a very small sample size, but I can only go from my own experience) are difficult to get the tubes into even though the holes are straight. There seem to be catches on the inside of the blank (not sure how the dye plays into that, but the undyed burl that I worked with tonight did not have this problem), and I actually had to file down the inside of the blank and enlarge the holes a bit to get the tubes to glue into them.
I decided to do two Classic American style pens with the dyed burl (the dye in this case is a blue-green, which contrasts interestingly with the natural brown of the burl) - one with a gold kit (from Woodcraft) and one with a chrome kit (from Lee Valley, in Ottawa). Interestingly, though the kits look pretty much the same, there are some differences in the assembly and turning instructions. For instance, with the Lee Valley kits, you part off 3/16" instead of 1/8". I actually parted off 3/16" for both pens, and there is no real problem, but the gold pen does look slightly different from the other Woodcraft CA pens that I have made.
When turning the chrome pen, I got some tearout in the bottom barrel - I could see the brass tube through a hole in the wood. In the past, I would have parted off the rest of the wood and called it a lost cause - maybe using the top barrel as part of a hybrid pen later. However, I decided to see if I could fix it. I put a mixture of medium CA glue and the shavings from the burl (which were all over the lathe) into the hole, and let the glue set. Then, I sanded it down to the level of the rest of the barrel. For some wood, this would not work because you would be able to see where the grain was messed up, but because of the varied nature of the burl, this technique worked like a charm. The pen was saved, and there is no way to tell where the patch was placed unless you know to look for it - and even then it is tough.
Here is the chrome pen - the gold pen looks very similar, but of course the fittings and trim are gold where this one is silver:

This has GOT to be one of the coolest-looking pens I have made out of wood. One interesting thing about working with the dyed burl that was NOT so great: When I was turning it, it was almost like working with acrylic. Instead of smelling wood, like when I work with cocobolo or bloodwood, I was smelling the dye. It was not quite as bad as acrylic, but it reminded me that if I am going to work with acrylics again (and I do have quite a few neat acrylic blanks), I should probably wait until the weather gets warmer and I can work with the garage door open.
Tonight I cut and glued the start of six pens - Classic American Maple Burl (undyed), Slimline Maple Burl (undyed), Classic American Bocote (Chrome kit), Pink Ivory Wall Street II (A style that uses one short piece of wood, which is good for a lot of the pieces I have left over from other pens. I have not made any of these before), Cocobolo Wall Street II, Cocobolo Broker Pen. Lots of different bushings and drill bits involved with these. On one of them, I messed up the gluing, and had to cut the tube in half and put the cut half into the other side of the blank. It should still work okay.
I do eventually want to start in on winestoppers and the egg kaleidascope, but I am really enjoying seeing how the more interesting blanks come out when they are turned.
Sunday, January 6, 2008
Wrapping up the year, and unwrapping new presents
Wow! I did not realize that it had been so long since I posted here. December was a very active month, though not so active regarding my turning after the first couple of weeks.
I finished the pens that I made for co-workers, and they came out pretty well! I think that I am finally gaining SOME expertise in this area:


It is kind of hard to tell from these photos, but the finish on all of these was really nice, and the cocobolo ones especially had some really nice grain!
I actually kept my Woodcraft trips down, but that was mainly because I was out of town for the second half of the month. I think December was actually a PLUS month for the finances, which is a nice way to end the year. I had income from the pens that I sold. More on that at the end of the post.
While out in LA during the third week of December, I had occasion to see my uncle for the first time in over 2 years. I showed him some of my pens (my stock was somewhat depleted) and he was pretty impressed. I had actually planned to make him a pen before heading out, but weather issues (a snowstorm changed my flight plans) made it so that I did not have the time. I sent him some links, though, and I will make him a pen soon.
I also have to send out my first fountain pen to a friend in Chicago. Just because I have not sent it yet does not mean that it will go to anyone else. :-)
As I mentioned in an earlier post, the fact that I have this hobby seems to make me easier to shop for during the holiday season. I received some very nice gifts, including: a book on pen turning, some pen blanks of nice burl, a piece of tulipwood that can be used for wine stoppers or eggs (more on the egg thing in a moment), and some small turning tools.
I also received a gift card for Woodcraft, which I am going to use to buy a stand for my lathe. By doing this, I will open up bench space that I can use to lay out my kits and my wood. This will let me better organize my projects. I will also rearrange the placement of the benches and tools and storage within the garage/woodshop. The lathe stand is supposed to be in stock next week sometime, so I am taking a bit of a break from turning until I get the stand. I do not want to be in the middle of a project when I start to move everything around.
Now, what is all of this talk about eggs? Well, one of the books I got for the holidays describes how to turn ornaments and eggs. Wooden eggs actually look pretty cool. Also, you can make kaleidescopes that are egg shaped. I bought myself one of the kits to do just that.
You can turn the eggs on the mandrel that is used for the pens and pencils.
My goals for 2008 include turning pens that I can sell at a shop or something, and also turning a successful winestopper and a successful egg. If I can do an ornament, so much the better. :-)
To tally up as best I can for 2007, in terms of cost:
Previously: Out of pocket $242.47, Total: $341.56
Expenses: 43.67 on kits, 2.50 on wood
Income (!): $135 for the five pens I made for co-workers
End 2007:
Out of pocket $153.64, Total: $252.73
I also bought myself $60 in gift certificates for $50, but when I use them I will just count it all as out of pocket. There were some kits and blanks I got at Lee Valley in Ottawa, but as those are being paid for out of a different account, I am leaving that alone.
So far in 2008: Out of pocket: $14.59, Total: $14.59
Subscribe to:
Posts (Atom)