Yesterday I cut some more blanks to use with my batch of pen kits. I cut a bloodwood blank to make a Classic American pen with, to go with the letter opener that my wife is giving to her co-worker as a present. My last attempt at this ended up with tearout, so we cannot give it away as a present.
I also cut a piece of Olivewood into three blanks to be used for slimline pens. I made a Classic American pen out of Olivewood that came out very well a while back (ended up as a gift to a co-worker of mine), so I decided to make some more pens with it. The piece of Olivewood that I am using for the pens is a large piece that was on the $1 discount table at WoodCraft. I should be able to make at least 8 pens with it, so I am way ahead on the deal (pen blanks that you buy are usually $1 per blank and up), assuming that the pens come out well.
I also cut some Bocote for use as Classic American pens. I did not cut any Cocobolo yesterday, though I may do so soon. I kind of want to see what happens when I make a Classic American pen and a slimline pen out of the same wood (Bocote or Cocobolo or Olivewood or Bloodwood), just to get an idea about which woods work better with which sized pens.
I only drilled and glued the bloodwood yesterday, but Saturday I will turn the Bloodwood and maybe (if I get inspired) the purple Acrylic pen that has been drilled and glued ever since that fateful day when I first tried to make an acrylic pen. I will also drill and glue the other blanks, and maybe (depending on how long I am at it) I will get to turn some of those as well. We will be away for much of the next week, and I think I will miss the turning, so I want to get a bunch of it in before we go. My wife is singing with her choral group at a wedding on Saturday, so I should have some time if I want it.
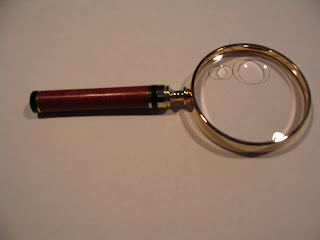
I picked up a large piece of holly wood at Woodcraft, with the idea of perhaps using the holly as the wood for the white pieces of a chess set. I want to turn a couple of pens with it, but the wood is REALLY white with no grain lines to speak of. This may work well for the chess set, but a pen would probably look really boring. So, I need to find another use (maybe a magnifier, or maybe as accents in a composite pen?), or keep it on the shelf until I actually decide to make the chess set. I still need to decide on a dark wood for the black pieces of the chess set, too.
I have seen online that you can clean MicroMesh with a brush that has bristles on it. I think I might recycle my old grill-cleaning brush as a sandpaper-cleaning brush if it works. I'll give it a shot on Saturday.
Thursday, June 21, 2007
Monday, June 18, 2007
Sharpening changes, and a trip to the office
Today I went in to my office in Burlington, MA. One of the (many) things I did while I was there was to show my new pens to the co-workers who visited the office where I was sitting. I also gave my old boss the pen that I made for him (as thanks for the tip he gave me about the plumbing issue I was having), and gave my office-mate the cocobolo slimline pencil that I made.
On the way home from work, I stopped in at Woodcraft (big surprise there). I brought the skew jig that I had recently bought from there, and the skew chisel that I tried to sharpen it with (with VERY limited success). I intended to ask one of the people there to show me how to correctly use the skew jig with the sharpening system so that I could correctly sharpen the skew chisel at home. The person I asked to do this was Chris, the 18-year-old who taught the bowl-turning class that my wife and I took last month. He sharpened the chisel for me, taking a lot of his time to do it (for which I was very grateful), but instead of my trying to sharpen it myself using the skew jig, I traded in the skew jig for a diamond stone. A diamond stone allows for hand sharpening of the skew chisel, and also allows for more of a margin of error. Chris showed me how to use it, and also told me that he and his father ALWAYS use the diamond stone to sharpen the skew chisels because of the difficulty of doing it on the sharpening system.
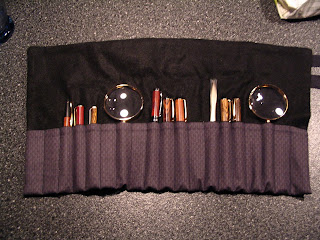
I also got to show the folks at Woodcraft the PenPal 1000, a creation of my wife's that allows me to carry my pens (and magnifiers and such) around with me in style:
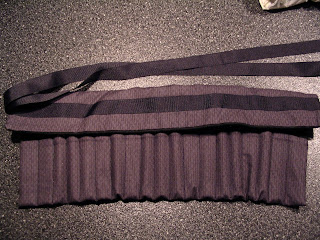
When closed, it looks like this:
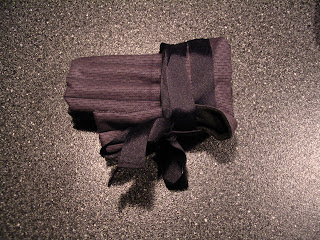
When wrapped up as a carrying case, it is very easy to bring around with me:
It's an excellent present, and I am very grateful for it. Now that I have a sharp skew chisel, I can start making new things for it. I think the next thing will be the bloodwood pen to match the letter opener, but I have some ideas for projects after that one.
On the way home from work, I stopped in at Woodcraft (big surprise there). I brought the skew jig that I had recently bought from there, and the skew chisel that I tried to sharpen it with (with VERY limited success). I intended to ask one of the people there to show me how to correctly use the skew jig with the sharpening system so that I could correctly sharpen the skew chisel at home. The person I asked to do this was Chris, the 18-year-old who taught the bowl-turning class that my wife and I took last month. He sharpened the chisel for me, taking a lot of his time to do it (for which I was very grateful), but instead of my trying to sharpen it myself using the skew jig, I traded in the skew jig for a diamond stone. A diamond stone allows for hand sharpening of the skew chisel, and also allows for more of a margin of error. Chris showed me how to use it, and also told me that he and his father ALWAYS use the diamond stone to sharpen the skew chisels because of the difficulty of doing it on the sharpening system.
I also got to show the folks at Woodcraft the PenPal 1000, a creation of my wife's that allows me to carry my pens (and magnifiers and such) around with me in style:

When closed, it looks like this:

When wrapped up as a carrying case, it is very easy to bring around with me:

It's an excellent present, and I am very grateful for it. Now that I have a sharp skew chisel, I can start making new things for it. I think the next thing will be the bloodwood pen to match the letter opener, but I have some ideas for projects after that one.
Wednesday, June 13, 2007
The tears that come from tearout...and some sharpening tips
Though I had heard quite a bit about the dangers of tearout when using a skew chisel (tearout happens when you do not get a clean cut when turning, and a chunk of the wood comes out instead of shavings), I had not personally experienced it in a way that was detrimental to my craft...until today. I made a Bullet Tip Pen (which, aside from the tearout, actually came out quite well) and a Classic American Pencil (ditto) out of bloodwood. In both cases, the item was nice and smooth and had a great finish...except for small tears in the wood that were too deep to sand out. So, I have a pen and pencil that I can use, but cannot really give away or sell.
My next step is to sharpen my tools again. In order to do this, I need to set up the other side of the jig that is on my sharpening system. The sharpening system has two wheels - one rough, one fine. The rough one is for setting the edge on a tool, but it removes a lot of steel if you use it all the time for sharpening (which I have, up to now). The fine one is to keep tools sharp. I need to set up the jig on the fine side, so that I can sharpen the skew chisel and the roughing gouge, and avoid tearout in the future.
I also need to buy another Classic American kit (or 10), as I promised my wife that I would make her friend a letter opener (already made) with a matching CA style pen or pencil. The pencil today would have been perfect...except for the tearout. I will try to get a good picture of the tearout, but it may be tough to get on camera. Unfortunately, that does not mean that the tearout cannot be noticed with the naked eye.
Luckily, I have a lot more bloodwood to work with, once my tools are sharp again.
Tuesday, June 12, 2007
Working with bloodwood again
Today I made the magnifier and letter opener from the bloodwood blanks and tubes that I drilled and glued yesterday. I did have to trim down the tubes that were sticking out of the blanks, but as I noted in my last post, this just made the whole thing a bit shorter - it did not keep parts from fitting together, as it would if it happened with a pen kit that had two pieces.
The items came out pretty well:
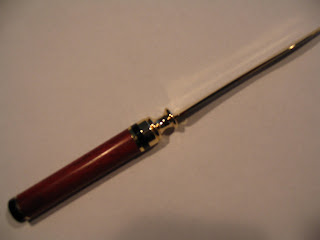
For some reason, the letter opener would not lay flat when I was taking its picture, which is why we get the knife-edge kind of photo.
Tomorrow, or later in the week, I will tackle the bullet tip pen. It may be easier to make the tenon with bloodwood than it was with cocobolo, as bloodwood is a harder wood, but I am not sure.
As I am making more gifts (and things to potentially sell), I am spending more time gluing pieces. For instance, the pieces of the kits that are pressed on to either end of the handles of the magnifier and opener are fairly loose. When I first started this process, I would not care so much, but now I am gluing the pieces on so that they stay put. All part of the learning curve, and of having pride in the work, I suppose. :-)
The items came out pretty well:


For some reason, the letter opener would not lay flat when I was taking its picture, which is why we get the knife-edge kind of photo.
Tomorrow, or later in the week, I will tackle the bullet tip pen. It may be easier to make the tenon with bloodwood than it was with cocobolo, as bloodwood is a harder wood, but I am not sure.
As I am making more gifts (and things to potentially sell), I am spending more time gluing pieces. For instance, the pieces of the kits that are pressed on to either end of the handles of the magnifier and opener are fairly loose. When I first started this process, I would not care so much, but now I am gluing the pieces on so that they stay put. All part of the learning curve, and of having pride in the work, I suppose. :-)
Monday, June 11, 2007
A small tip about drilling
Today I cut some bloodwood on the band saw, and I will try to make a magnifying glass, a letter opener, a Classic American pencil and a Bullet Tip Americana pen out of the blanks. I still ran into a bit of trouble with the magnifier and letter opener blanks. The tubes got stuck a bit. However, this is less of a problem than it would be with a pen blank, as I can shave off the ends of the tube and just end up with a shorter handle on the magnifier or opener. I might not even have to do that - if the kits call for parting off some of the wood, I can just make it so that the part that is already out of the blank is the part that has been parted off. We'll have to see.
I did figure out that, with bloodwood at least, drilling quickly is the answer to some of the drilling issues. When I drilled through the blank quickly, the tubes fit more easily into the holes. We'll have to see if that holds with other woods as well. If that could be the answer to the cocobolo drilling nightmare, I would be very happy.
Of course, even with drilling quickly, I got a tube stuck in one of the blanks, as stated earlier (one of them I drilled slowly, so that does not count), so there may be a bit more of a learning curve.
Another tip I learned a little while ago, that I made use of again today: Thin latex gloves help with the gluing process. I do not get glue all over my hands any more.
Hopefully soon there will be pictures of bloodwood crafts to post. I am a bit scared of the bullet tip pen. The turning process includes parting a tenon in one of the halves of the pen, and also the top part of the pen does not get evenly turned. The very top of the pen is thinner than the part near the middle, so there is a gradual thickening. I messed this up the first time I put one of these together.
Yesterday I bought 10 slimline kits, like the one that I made with cocobolo. If you buy them in packs of 10 you get a discount. So, I may be making a lot more slimlines. Not a big deal now that I can cut the blanks myself, so I do not lose as much wood in the turning process.
Friday, June 8, 2007
Making slimlines again...
Though my very first pen was a slimline (they are easiest to make, as the halves are interchangeable), I have been avoiding making them because it seems that you lose a lot of wood in the process. If you start with a store-bought pen blank, what you are left with when the slimline pen is made (percentagewise) is not a lot. Most of the blank ends up as shavings on the floor of the woodshop.
However, now that I am cutting my OWN blanks, I can cut them smaller if I know that I am making a slimline pen from them. Conversely, if I cut the blanks badly for a bigger style of pen, I can use the badly-cut blanks for slimline pens.
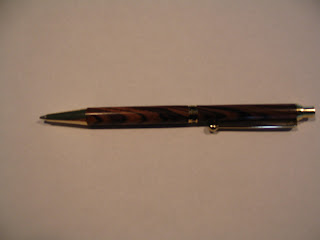
Cases in point are the two slimlines (one pen, one pencil) I made tonight. The kits were ones that I bought at Woodcraft back when I thought I would be making a lot of slimline pens. The first is made from Bocote, and the kit is a Satin Pearl slimline kit. The wood and the kit do not go together very well:

The second was an American Slimline Pencil kit that I made with cocobolo wood. This one came out very well. I may get more of these type of kit:
The lesson, as always: Don't throw anything away. Most things that are not useful for one project will come in handy for another one.
However, now that I am cutting my OWN blanks, I can cut them smaller if I know that I am making a slimline pen from them. Conversely, if I cut the blanks badly for a bigger style of pen, I can use the badly-cut blanks for slimline pens.
Cases in point are the two slimlines (one pen, one pencil) I made tonight. The kits were ones that I bought at Woodcraft back when I thought I would be making a lot of slimline pens. The first is made from Bocote, and the kit is a Satin Pearl slimline kit. The wood and the kit do not go together very well:

The second was an American Slimline Pencil kit that I made with cocobolo wood. This one came out very well. I may get more of these type of kit:

The lesson, as always: Don't throw anything away. Most things that are not useful for one project will come in handy for another one.
Wednesday, June 6, 2007
My own pen blanks!
The whole process is coming together. With the band saw, I can now take large pieces of wood and create my own pen blanks. There was a bit of trial and error here, too. Strangely enough, I learned that using the miter gauge on the band saw was not the way to go. Drawing lines on the wood and using those as a guide worked MUCH better than trusting that the wood was being cut straight just because I was using a miter gauge. The miter gauge helped when I cut a large piece off of an even larger piece of wood, but did not help so much when needing precision.
I also might have solved one of my gluing issues, though it may be too early to tell. I think I was putting too much glue on the tube before inserting it into the blank. I had forgotten that the process of putting the tube into the blank involves twisting the tube in order to spread the glue around, so I did not need to put glue all over the tube before inserting it. On the set of pen blanks that I just drilled and glued, I used a lot less glue and the tubes went nicely into the blanks. Of course, the real test is to see if the tubes stay glued when I do the barrel trimming and the turning. Stay tuned...
My last two Classic American pens, made from the large piece of cocobolo wood that I bought at Woodcraft, came out really well. I think I might be getting the hang of this!
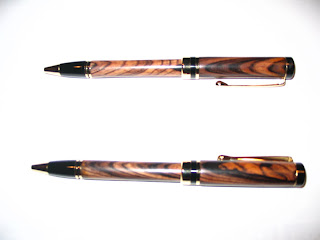
I used the picture with the flash to show the grain of the wood and the polish of the pens.
I made some Bocote pen blanks last night, and drilled and glued them for a matching pen/pencil set that I hope to turn over the next couple of days. I also set up to turn a couple of slimlines - one pen, one pencil - which I have not done since the very first pen that I turned in my own woodshop.
Sunday, June 3, 2007
Cooking cocobolo, or: Still a couple of bugs in the system
As mentioned earlier, there is a type of wood that seems to be VERY difficult to drill and glue correctly. Cocobolo is a fantastic-looking wood, and it is very easy to turn, but it is also a wet wood (a lot of moisture in it), and for that reason, drilling it is a pain in the neck. The moistness of the wood means that when it is drilled, the drill bit heats up the interior of the wood (around the hole being drilled), and the hole shrinks after it is drilled. So, even though the drill bit can go through the wood with no problem, the brass tubes do not fit into the resulting holes. It is almost a paradox, and is very frustrating. None of the tips mentioned earlier work well to fix this problem.
My guru at Woodcraft suggested microwaving the pen blanks for 30 seconds at a time, multiple times (letting them cool in between). I have tried this, with no success. I have also tried drilling slightly larger-than-usual holes, and using the gap-filling glue. This sometimes works, and sometimes results in the tube coming out of the blank during the barrel-trimming process (since the tube did not really bond to the inside of the blank). Again, somewhat frustrating.
The latest piece of advice that I have received, which I have not yet tried, is to drill the holes and then let the blanks dry in the woodshop for a week, and then redrill the holes. I suppose that this COULD work, but I am not holding out high hopes for it. Luckily, I have the Bocote and the bloodwood to work on while the cocobolo dries.
The band saw - last piece of the puzzle?
As I have become more comfortable with power tools, I have gradually accumulated a tool that will help with each part of the process. There is the lathe, of course, which started this whole hobby going. Then there is the grinder for sharpening my tools, and the drill press for drilling out the holes.
For cutting my wood, though, I was relying on a pretty cheap miter saw kit that I bought at the Woodcraft store. The kit consisted of a small miter saw and a small miter box. The box I glued to a piece of wood that I could clamp to the workbench. This setup was barely adequate for cutting pen blanks, and even then the box was so cheap that the saw cut into it, widening the miter slots and making them less useful. As a result, my cuts were not right angles - not a HUGE deal when cutting pen blanks, but not great either.
This solution also meant that I was restricted to starting the pen making process with pre-cut pen blanks and other small pieces of wood, as I could not put any large pieces of wood into the small miter box. In order to take advantage of the savings that could be had by purchasing larger pieces of wood and cutting them myself, I would need a solution that could make more accurate cuts and cut larger pieces of wood.
Enter the band saw. The band saw can cut larger pieces of wood into pen-blank size pieces, and can also cut some of the scrap wood that I have collected to practice spindle turning with. It can also cut smaller bowl blanks when I start to do bowls (if that ever happens).
So, while I still need to extend the miter fence with a piece of scrap wood, I can (and indeed have) cut a larger piece of cocobolo wood into pen blanks. I also have a large piece of bocote and a large piece of bloodwood to use. Once I extend the miter fence, the only thing that is stopping me from churning out nifty-looking pens is my supply of pen kits. I have quite a few, but I will start ordering them in bulk to save money, since I have everything else in place.
Friday, June 1, 2007
Woodturning bowls...similar, yet different
For my birthday, my wife got me a gift certificate to Woodcraft (see "Easier to shop for", an earlier post...it is already reaping dividends!). I decided to use some of the money to take a "bowl-turning" class. Bowl-turning is still woodturning on a lathe, but the similarity between it and spindle turning pretty much ends there. Spindle turning (which is a broader category that encompasses pen turning and other woodturning that is "between centers") results in long, thin, cylindrical crafts. Bowl turning uses different gouges and scrapers (not used for pens at all), and is done by taking a basically square bowl blank, rounding the outside with the inside piece screwed into a chuck on the headstock of the lathe, and then hollowing out the inside while the bottom is attached to the headstock. If you are confused, don't worry. You are not alone.
It was a pretty cool class, and we learned a lot, but because the bowl turning is SO different from the pen turning, I have decided to try and master the spindle turning basics (at least) before attempting to do another bowl class, or attempting to do a bowl in my woodshop. I have already spent so much money on this hobby that I do not want to shell out for MORE tools, and there are several that I would need to start bowl turning at home.
For those of you that are curious...here are the first Meltzer-turned bowls. My wife's is the larger one on the right - I shaved off too much wood before I started shaping the bowl:
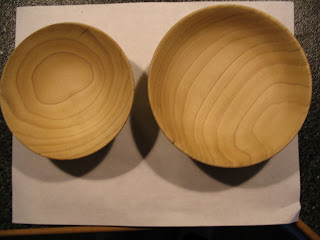
The cool thing is that these are made from a relatively cheap wood - poplar - and yet, because of the grain, they look pretty good. As I have seen with the pens, cheap wood (money-wise) can result in a good piece of work.
Subscribe to:
Posts (Atom)