So we had the second class last week, and practiced more spherical, or at least rounded, spindle work. Same tools, just a different technique. We also learned a lot about sharpening, though I do not know if I will be very confident until I have sharpened all of my tools with the instructor watching. I hope to do that next class, which is a week from tonight.
I have set up some of the beautiful burl pen blanks that my brother sent to me to be made into pens. They have been cut and drilled and glued...only the barrel trimming and the lathe-work is left. Then, of course, putting the pen together, which is always a bit nerve-wracking.
I have signed up for the Woodturning Symposium in NH on the Saturday of Memorial Day weekend. It is looking like it should be a great time - lots of woodturners demonstrating, and lots of vendors. No hands-on work, but there will be a lot to see. It was recommended by the teacher of the class I am taking. The last one was three years ago - coincidentally, the weekend that we moved into our house. I knew nothing about woodturning then.
I have been debating about what to make for my high school's auction. I think I will do a pen and pencil set. Maybe even two of them. I will leave out the letter openers for now.
I have been looking into making lidded boxes. I have a blank (from when I attempted a pepper mill at home) that would be perfect, but I need to get more tools. I do not have the tools that I think I need to hollow out the box.
Showing posts with label pen blanks. Show all posts
Showing posts with label pen blanks. Show all posts
Thursday, February 12, 2009

Wednesday, August 29, 2007
Assembly Line Pen turning
The kits for the large group of broker pens came on Monday. Last night, I cut the blanks for all of the pens. Four of Lignum Vitae (green on the outside, but a strange yellowish colour on the inside), four of Orangeheart, three of bloodwood, two of cocobolo, and one of bocote. I do not know if I will use all of the Lignum Vitae or the Orangeheart, but the blocks I had cut easily into four blanks each.
Tonight I drilled the blanks, and a couple of them I will probably not use. Orangeheart is very difficult to drill. It seems like a very soft wood, and it kept getting stuck to the drill bit.
This is my first attempt at this kind of "assembly-line" pen turning. Usually, I will take a pen or two up to the point where the tubes are glued in, then turn them the next time. With this group, I am cutting all of the blanks one night, then drilling them the next, then tomorrow (or soon) I will glue all of the tubes in. I may even turn them all before assembling any of them. I guess, if I am to do many pens on a regular basis, I will have to do it this way, as it is too time-consuming otherwise.
I am very interested to see how the orangeheart and the lignum vitae look after they have been turned.
Tonight I drilled the blanks, and a couple of them I will probably not use. Orangeheart is very difficult to drill. It seems like a very soft wood, and it kept getting stuck to the drill bit.
This is my first attempt at this kind of "assembly-line" pen turning. Usually, I will take a pen or two up to the point where the tubes are glued in, then turn them the next time. With this group, I am cutting all of the blanks one night, then drilling them the next, then tomorrow (or soon) I will glue all of the tubes in. I may even turn them all before assembling any of them. I guess, if I am to do many pens on a regular basis, I will have to do it this way, as it is too time-consuming otherwise.
I am very interested to see how the orangeheart and the lignum vitae look after they have been turned.
Monday, August 13, 2007
It was on the way home!
I went to my regional office today, and of course Woodcraft is on the way home from there. :-) So, I stopped in to return the plastic hose fitting that did not work. That was $3.99 credit, so I bought a Pink Ivory pen blank and an interesting green sparkly acrylic blank, which came to $3.98. However, since I did not count the hose fitting as being out of pocket before, I must count the blanks as being extra. Total out-of-pocket is now $55.51, with $75.51 being the total spent.
Thursday, June 21, 2007
Cutting some more blanks, and what to do about Holly?
Yesterday I cut some more blanks to use with my batch of pen kits. I cut a bloodwood blank to make a Classic American pen with, to go with the letter opener that my wife is giving to her co-worker as a present. My last attempt at this ended up with tearout, so we cannot give it away as a present.
I also cut a piece of Olivewood into three blanks to be used for slimline pens. I made a Classic American pen out of Olivewood that came out very well a while back (ended up as a gift to a co-worker of mine), so I decided to make some more pens with it. The piece of Olivewood that I am using for the pens is a large piece that was on the $1 discount table at WoodCraft. I should be able to make at least 8 pens with it, so I am way ahead on the deal (pen blanks that you buy are usually $1 per blank and up), assuming that the pens come out well.
I also cut some Bocote for use as Classic American pens. I did not cut any Cocobolo yesterday, though I may do so soon. I kind of want to see what happens when I make a Classic American pen and a slimline pen out of the same wood (Bocote or Cocobolo or Olivewood or Bloodwood), just to get an idea about which woods work better with which sized pens.
I only drilled and glued the bloodwood yesterday, but Saturday I will turn the Bloodwood and maybe (if I get inspired) the purple Acrylic pen that has been drilled and glued ever since that fateful day when I first tried to make an acrylic pen. I will also drill and glue the other blanks, and maybe (depending on how long I am at it) I will get to turn some of those as well. We will be away for much of the next week, and I think I will miss the turning, so I want to get a bunch of it in before we go. My wife is singing with her choral group at a wedding on Saturday, so I should have some time if I want it.
I picked up a large piece of holly wood at Woodcraft, with the idea of perhaps using the holly as the wood for the white pieces of a chess set. I want to turn a couple of pens with it, but the wood is REALLY white with no grain lines to speak of. This may work well for the chess set, but a pen would probably look really boring. So, I need to find another use (maybe a magnifier, or maybe as accents in a composite pen?), or keep it on the shelf until I actually decide to make the chess set. I still need to decide on a dark wood for the black pieces of the chess set, too.
I have seen online that you can clean MicroMesh with a brush that has bristles on it. I think I might recycle my old grill-cleaning brush as a sandpaper-cleaning brush if it works. I'll give it a shot on Saturday.
I also cut a piece of Olivewood into three blanks to be used for slimline pens. I made a Classic American pen out of Olivewood that came out very well a while back (ended up as a gift to a co-worker of mine), so I decided to make some more pens with it. The piece of Olivewood that I am using for the pens is a large piece that was on the $1 discount table at WoodCraft. I should be able to make at least 8 pens with it, so I am way ahead on the deal (pen blanks that you buy are usually $1 per blank and up), assuming that the pens come out well.
I also cut some Bocote for use as Classic American pens. I did not cut any Cocobolo yesterday, though I may do so soon. I kind of want to see what happens when I make a Classic American pen and a slimline pen out of the same wood (Bocote or Cocobolo or Olivewood or Bloodwood), just to get an idea about which woods work better with which sized pens.
I only drilled and glued the bloodwood yesterday, but Saturday I will turn the Bloodwood and maybe (if I get inspired) the purple Acrylic pen that has been drilled and glued ever since that fateful day when I first tried to make an acrylic pen. I will also drill and glue the other blanks, and maybe (depending on how long I am at it) I will get to turn some of those as well. We will be away for much of the next week, and I think I will miss the turning, so I want to get a bunch of it in before we go. My wife is singing with her choral group at a wedding on Saturday, so I should have some time if I want it.
I picked up a large piece of holly wood at Woodcraft, with the idea of perhaps using the holly as the wood for the white pieces of a chess set. I want to turn a couple of pens with it, but the wood is REALLY white with no grain lines to speak of. This may work well for the chess set, but a pen would probably look really boring. So, I need to find another use (maybe a magnifier, or maybe as accents in a composite pen?), or keep it on the shelf until I actually decide to make the chess set. I still need to decide on a dark wood for the black pieces of the chess set, too.
I have seen online that you can clean MicroMesh with a brush that has bristles on it. I think I might recycle my old grill-cleaning brush as a sandpaper-cleaning brush if it works. I'll give it a shot on Saturday.
Wednesday, June 6, 2007
My own pen blanks!
The whole process is coming together. With the band saw, I can now take large pieces of wood and create my own pen blanks. There was a bit of trial and error here, too. Strangely enough, I learned that using the miter gauge on the band saw was not the way to go. Drawing lines on the wood and using those as a guide worked MUCH better than trusting that the wood was being cut straight just because I was using a miter gauge. The miter gauge helped when I cut a large piece off of an even larger piece of wood, but did not help so much when needing precision.
I also might have solved one of my gluing issues, though it may be too early to tell. I think I was putting too much glue on the tube before inserting it into the blank. I had forgotten that the process of putting the tube into the blank involves twisting the tube in order to spread the glue around, so I did not need to put glue all over the tube before inserting it. On the set of pen blanks that I just drilled and glued, I used a lot less glue and the tubes went nicely into the blanks. Of course, the real test is to see if the tubes stay glued when I do the barrel trimming and the turning. Stay tuned...
My last two Classic American pens, made from the large piece of cocobolo wood that I bought at Woodcraft, came out really well. I think I might be getting the hang of this!
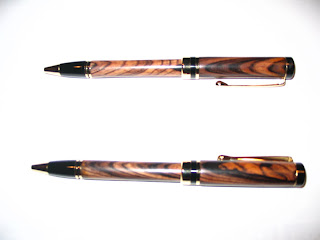
I used the picture with the flash to show the grain of the wood and the polish of the pens.
I made some Bocote pen blanks last night, and drilled and glued them for a matching pen/pencil set that I hope to turn over the next couple of days. I also set up to turn a couple of slimlines - one pen, one pencil - which I have not done since the very first pen that I turned in my own woodshop.
I also might have solved one of my gluing issues, though it may be too early to tell. I think I was putting too much glue on the tube before inserting it into the blank. I had forgotten that the process of putting the tube into the blank involves twisting the tube in order to spread the glue around, so I did not need to put glue all over the tube before inserting it. On the set of pen blanks that I just drilled and glued, I used a lot less glue and the tubes went nicely into the blanks. Of course, the real test is to see if the tubes stay glued when I do the barrel trimming and the turning. Stay tuned...
My last two Classic American pens, made from the large piece of cocobolo wood that I bought at Woodcraft, came out really well. I think I might be getting the hang of this!

I used the picture with the flash to show the grain of the wood and the polish of the pens.
I made some Bocote pen blanks last night, and drilled and glued them for a matching pen/pencil set that I hope to turn over the next couple of days. I also set up to turn a couple of slimlines - one pen, one pencil - which I have not done since the very first pen that I turned in my own woodshop.
Subscribe to:
Posts (Atom)